
IKEA Hejne Pedal Board Build, May 2017
It is often said that we all stand on the shoulders of giants.
This is, of course, a metaphor. There are no actual giants, and if there were, I doubt they'd allow us to stand on them, or tame them, nor would they fight with us against the frost zombie hordes.
Constructing your own pedalboard is definitely not a new idea. It's often seen as a Jedi-like rite of passage - once you've constructed your own board, your esteem grows, and your ability to extract face-melting tones form your eclectic and previously unwrangled gear improves. (In theory.)
The idea of using cheap and cheerful IKEA shelving products as building materials for pedalboards is also not new. A brief google search for 'GORM Pedalboard' or 'IKEA pedalboard' will (if you're anything like me) kick off many enjoyable hours of reading, as everyone seems to have had their own unique approach to the curly problem of turning some hunks of soft pine into a sturdy and reliable thing that you jump up and down upon while engaging in afore-mentioned face melting.
People have been doing it for so long, that many of the articles you'll find will be re-posts of re-posts of threads on forums that have long since disappeared, and whose embedded pictures have succumbed to the dreaded BrokenImageLink. IKEA themselves have even changed the name of the product that most custom boards are built upon - the GORM shelf is no more, having been replaced by the HEJNE. (Dimensions are almost identical, price still incredibly cheap.)

A quick sample of some of the amazing IKEA pedalboard builds out there.
So yeah, standing on the shoulders of giants. When I first started gigging, I used to just set my pedals up on the ground before each gig, which of course whas time consuming, and pedals had a tendency to move around on the ground when you stomp on them, unless you gaff-taped them down, which of course took even more time.
Soon enough, I graduated to a pre-made pedal case: the Behringer PB1000, which served me well for quite some time (once i'd made room for the ridiculously large channel switcher for my Engl amp).
Eventually the moulded plastic succumbed to years of abuse, and the power input suffered fatal damage from an errant singer's boot, so it had to go. It was replaced with an even cheaper moulded case from those wonderful people at Swamp Industries, which (of course) turned out to have similar drawbacks, and was then replaced with a proper aluminium PedalTrain-style board and isolated power supply.
Good solution. Sturdy. Tough padded bag. Portable. Much cheaper than an actual PedalTrain board.
... but too small to fit everything on it that I needed for an upcoming gig where I'd be doing covers of 90's band Garbage. Their guitar sounds are heavily effected, and they use extensive layers in their production, so I needed a board with room for more effects, plus a two-button loop pedal.
This prompted mcuh reseasrch into the idea of building my own board. I went down the link-following rabbit hole of research into the myriad of different GORM/HEJNE boards out there, and decided that I should give it a crack. I wanted my board to be angled, I wanted it to have an upper 'tier' so that the top row of pedals wouldn't be so far away from my foot, I wanted to have a consolidated place for all the inputs and outputs (including the cable for my amp switcher and an FX loop), and I wanted some funky LED lighting effects. I was feeling very Courage Wolf.

Inspirational.
Off to IKEA I went. The board is basically constructed form one pack of large HEJNE shelves, $20 AUD. I also went to Bunnings to pick up an assortment of screws, angle brackets, rubber feet, and a few other bits and bobs.

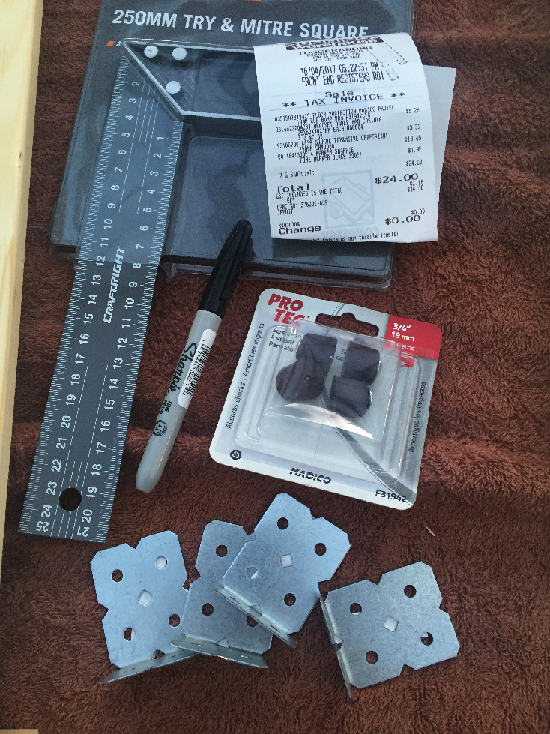
I was surprised to learn that I didn't have a set square. This may explain the failure of some of my other woodworking efforts.
As is normal for these kinds of projects, I'd be making a fair few return visits to the temple of the burnt sausage before I was done. It doesn't matter how well you plan or how well stocked your toolbox is, you cannot complete a project without a few last-minute runs to the hardware store. Fortunately for me, my local Bunnings is only two minutes up the road.
The game was afoot. I began by lopping off one slat from one shelf to make the base and 'foot', and lopping off two slats from the other shelf to make the tier. The remaining three slats would be used for support under the board.

I wanted to make sure I had enough room for my wah pedal on the right side of the board, so I plonked it on the board and marked out on the two-slat tier piece where to cut.


I lopped off the slats, and re-attached the end piece of the upper tier.
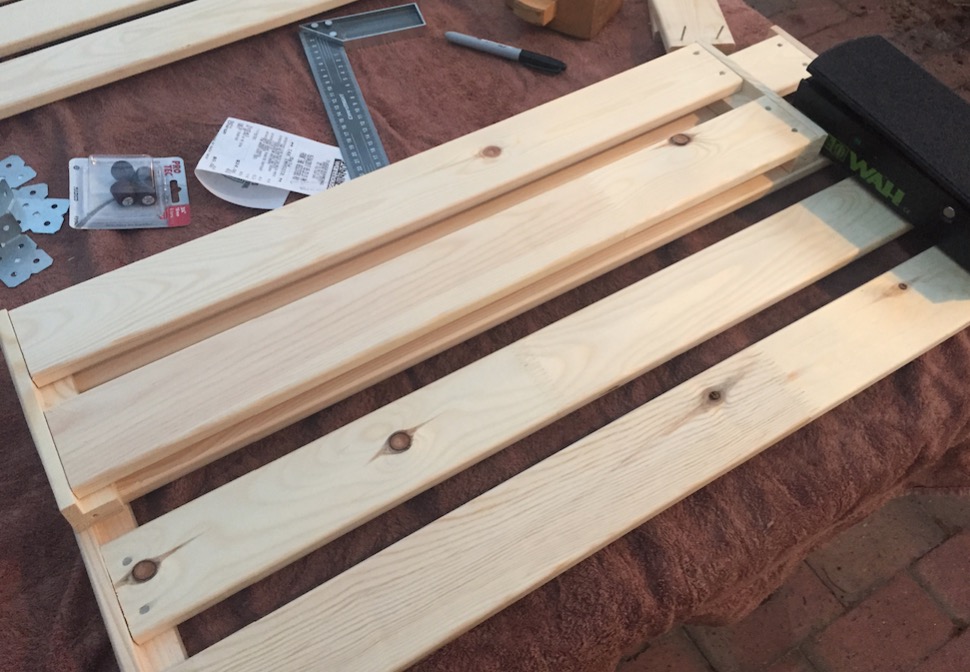
With the two tiers ready, I set about adding the 'foot'. After a bit of wailing and gnashing of teeth, and some convoluted efforts around trimming various notches and tabs and things in the various pieces of wood (which, in deference to actual craftspeople I will not call 'joinery'), I had the rear panel/foot thing ready to be attached to the main board.


I spent more time wailing and gnashing my teeth trying to figure out how to attach both the top tier and the rear panel to the main board. I decided on angle brackets (after yet another trip to bunnings...) as pictured below, but in retrospect I could have put these on the inside instead of the outside.

The remaining slats were then chopped up to provide structural support for the underside of the baord, and attached to the rear panel with more angle brackets. (Different type though.)


This was the final step in the structural build. I was happy with the solidity and rigidity of the board, so moved on to presentation. The edges of the shelves weren't designed by IKEA to be visible - the system they are built for covers them up, so (you guessed it) back to Bunnings to buy some moulded edge trimming to tidy up the front, back and sides.

Ugly.

Less ugly.
Once all the uglier bits were covered up with slightly less ugly trim, I set about with a file and rounded edges as appropriate, and attached the Little Rubber Feet. Then I had to cut back enough of the vegetation from in front of my garden shed so that I could get in there and start spraypainting.

I had the rattle cans left over from that time I built a kit guitar and never got around to painting it.

I attached a pair of drawer handles (yep, another trip to bunnings...)
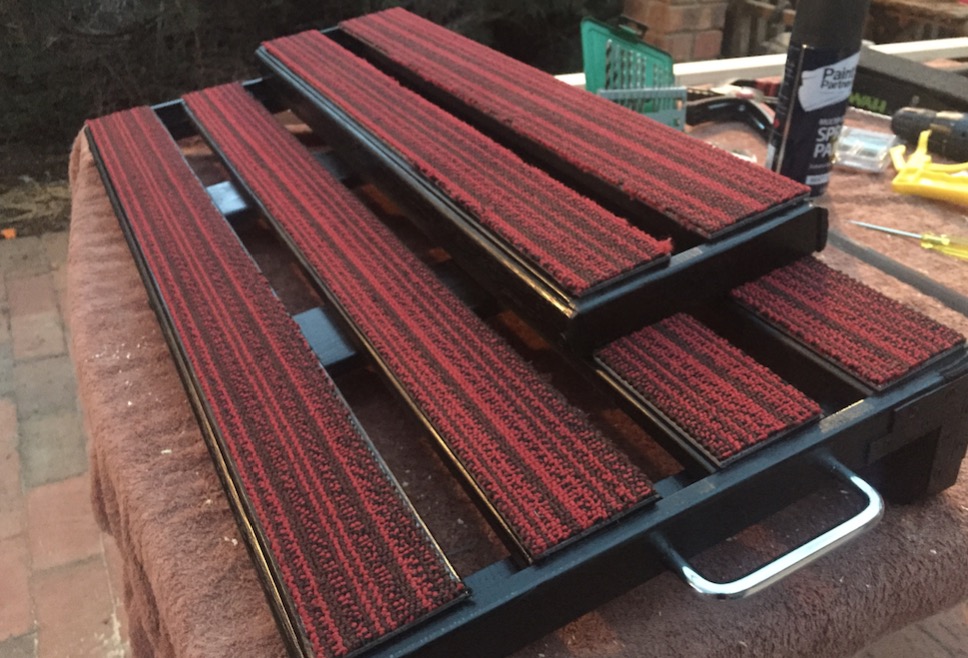
The project stalled a bit at this stage, as I prevaricated about trying to source cheap velcro tape. I was not happy with the idea of paying $50 for enough loop-only tape to cover the whole board, but after much deliberation (and a bit more reading of other board build pages), I happened upon the idea of using carpet tile as the 'loop' part on the board.
The friendly staff at Bunnings had a wry smile as I entered the store again, but I came away with two carpet tiles in the colour of my favourite sportsball team (for the princely sum of $6 each) and enough contact cement to fasten a large amount of things to a large amount of other things, as well as a nice new stanley knife. Some careful measuring and careful cutting and not-so-careful slopping about of glue later, and the board construction was complete.
The last phase of the build was all the cabling and electrickery underneath the board. I wanted to use the isolated power supply that I'd bought with my previous board, and I wanted the signal routing to be all in one place out the front.
I ordered three right-angle 1/4" jack to panel-nount Neutrik socket cables from Loopi Pedals - two short, and one long. (I use the FX loop in my amp for modulation effects, and for the looper pedal.) I also ordered a short RS232 male-to-female straight through cable and XLR-style panel mount so that I could patch my footswitch in, and two XLR mounting plates (in stainless steel, natch.)
I used the wall plates as templates and drilled out the necessary holes in the front panel of the board, mounted the cables and connectors to the plate, and labelled the front. (Kinda wish I had've been able to laser-etch the wallplate... maybe next time.)


I used Velcro tape to mount the power supply to the bottom of the board. I also mounted the power supply for the LED strip lights, using an IEC Y-adapter to supply power from the side of the board to both units.
Again, hindsight - I may have been able to use one of the outlets from the pedal power supply to drive the LEDs. Not sure whether it would have met the power requirements though. More experimentation is needed in this area.
I used a bunch of cable clips to keep everything vaguely tidy.

The last step was to mount all the pedals, patch them all together, and take it for a test run.

Of course, I managed to screw up the patching, which in turn lead to a rather late start to rehearsal one evening. I figured it out eventually though, and the board has been running well since (although I've removed the LEDs so that I could put a separate power supply in for the Line6 G10 Wireless system that I recenly added. (For some reason it runs off 5v USB power, instead of 9v. Go figure. I'll be adding a review of the Line6 after a bit more testing.)
So that's it! The board is enormous though, and - with all the pedals installed - quite heavy. (This was another reason I decided to pull out the LEDs and their power brick.) I was quite concerned about how I was going to transport it around, until I remembered that I'd bought a keyboard gig bag a while back. I'd originally bought it as a case for the Explorer-shaped guitar I'd made from a kit (yep, the one that still isn't painted), but since that guitar never leaves the house, it didn't need the gig bag, and the bag was just the right size to house the new board and some cabling.
Quite happy with the way everything turned out. All up, I think I probably spent about $200 in materials (those Neutrik connectors aren't bloody cheap!), but that's still less than half the price of the equivalent PedalTrain unit, plus I got to futz around with tools and things in the back yard for a few weekends.